Setting Up Your First Workload Cluster
Using a self-service PR automation to provision your first workload cluster
Overview
Now that you have a management cluster and your SCM connected, you can test-out our self-service provisioning using PR Automations and our terraform management system called Stacks. At a high level, this is going to:
- utilize a PR Automation (PRA) to instantiate a few CRDs into folders syncable by the root service-of-services in the
bootstrapfolder - The
InfrastructureStackCRD created by the PRA will create a terraform stack referencing code in theterraform/modules/clusters/awsfolder to provision a new cluster. Your management cluster should already have been configured with sufficient IAM perms to create this cluster. Any future commits to that folder will also be tracked and generate new terraform runs to sync in changes to the desired infrastructure.
Warning:
This Guide will not work properly unless you've finished the tutorial Integrate with your Source Control Provider.
Enable the cluster-creator PR Automation
There should be a crd at bootstrap/pr-automation/cluster-creator.yaml which will create the PRA that drives this tutorial. By default it references a github SCMConnection crd, you'll need to have created that fully, and eventually the operator will also create the PR Automation in our API, and it will be visible in the UI as well.
If it's not showing, navigate to the apps service, and you can filter on PrAutomation resources. You should be able to see error messages in the YAML explaining what the operator is tripping on.
Create a Workload Cluster
Now that PR Automation is configured, we should be able to spawn our cluster seamlessly. The steps are:
- Navigate to
https://{your-console-domain}/pr/automations - Click
Create a PRon thecluster-creatorAutomation Row
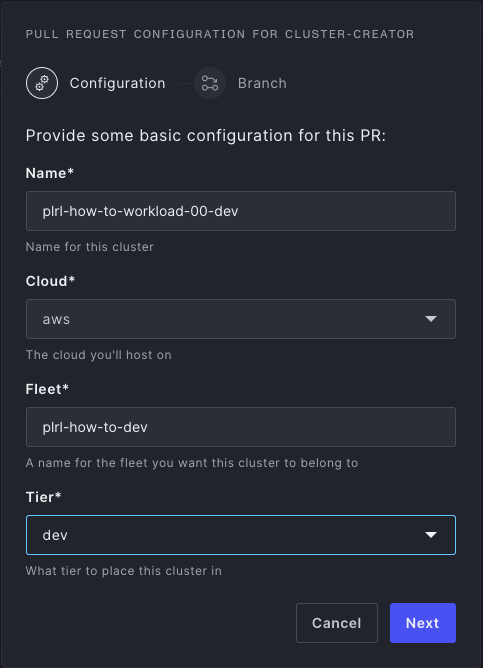
- Fill in the Required Fields
- Name: The Name of the Cluster
- Cloud: Cloud Provider to Deploy the Cluster (Dropdown Menu)
- Fleet: The Fleet to Associate the cluster (this is arbitrary but can help you group like clusters)
- Tier: The Tier to Place the Cluster (dev/staging/prod)
- Click
Next - Enter the Name of the Branch to Create the PR
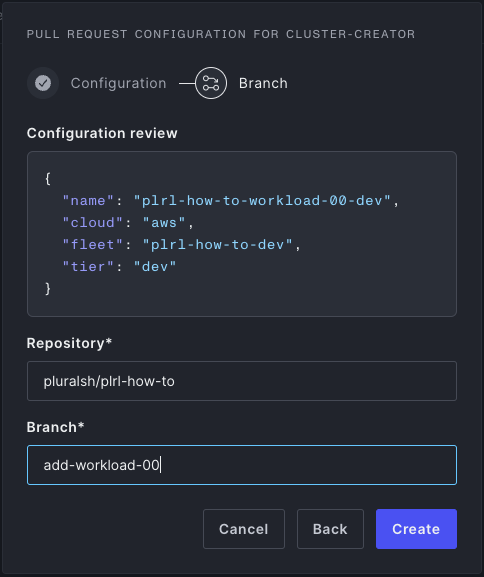
- Click
Create- Optionally view the PR that was created
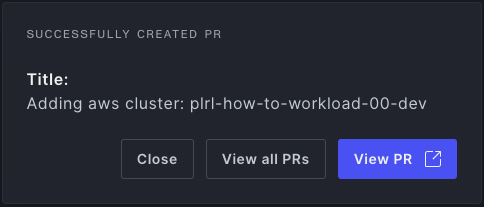
- Optionally view the PR that was created
- Merge the PR
Once this PR is merged, and our CD system syncs all the manifests, you should see a clusters service. This will have synced in the InfrastructureStack CRD and caused a Stack to be created at https://{your-console-domain}/stacks.
By default these stacks require approval for safety (terraform can do the strangest things sometimes, you should always validate a terraform plan before applying). To do that:
- Navigate to
https://{your-console-domain}/stacksand click on the run which should be inPending Approvalstate - Click the
ApproveButton in the top-right- You can also see the plan in the run logs and the
Plansubtab as well if you want to ensure the plan looks sane.
- You can also see the plan in the run logs and the
Info:
Cluster provisioning usually takes quite a while. On AWS, expect the process to take upwards of 20m, it can be more like 10m on GCP.
Overview of the GitOps Manifests Created
This PRA creates basically three GitOps manifests:
- A
ServiceDeploymentatbootstrap/clusters.yaml. This spawns a new service syncing theservices/clustersfolder. This is meant to reduce bloat in the mainbootstrapfolder, and is technically optional. - An
InfrastructureStackatservices/clusters/{cloud}/stacks/{name}.yaml. This configures the Stacks api to create a new terraform stack to manage the provisioning of the underlying EKS/AKS/etc cluster. It is tracking theterraform/modules/clusters/{cloud}folder. - A
ClusterCRD atservices/clusters/{cloud}/clusters/{name}.yaml. This creates a pointer CRD which is often used in other CRDs likeServiceDeploymentto reference clusters.
Warning:
The Cluster CRD is not created by default when registering a cluster. This is why the PR Automation creates it, and if you registered clusters another way, you'll need to create an instance of it as well if you want to use the other CRDs which reference it.